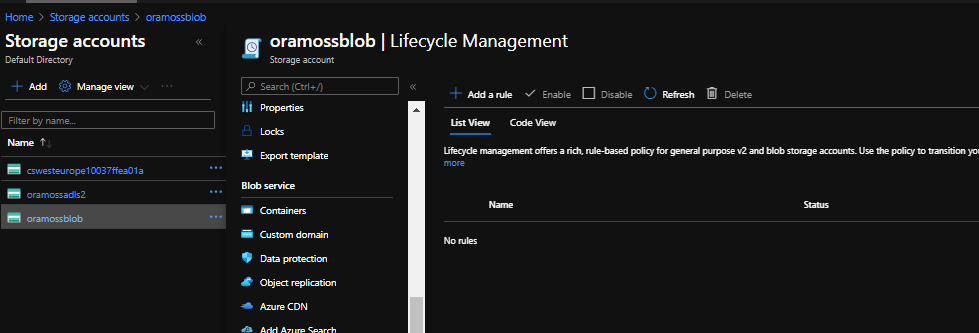
One of our clients wanted to set up a process to delete files from their blob storage containers after they aged beyond a certain time limit. Initially the conversation went down the route of creating some configuration information to drive the process, stored in a JSON file or a database and then periodically a process would use that configuration information to apply the rules across all the storage…I then thought hey surely Microsoft have dealt with this…and of course, they have…Lifecycle Management on the Storage Accounts, as documented here.
The Lifecycle Management Blade
Let’s take a rule we wanted to create and see how we can do that using Lifecycle Management. Imagine we want to remove files from a given folder in a given container on the Storage Account after thirty days.
On the Lifecycle Management blade click on “Add a rule” which brings up the first page of the wizard. Give the rule a sensible name (probably useful to define a naming standard that your organisation is comfortable with).
Set the rule scope which is either all blobs in the storage account or limit with filter – in this case we want to limit it to a particular container/folder and you’ll notice that when you select that radio button it adds a third page to the wizard (to set the limit settings).
Set the Blob type and Subtype – in this case I just want the defaults of Block Blobs and Base Blobs.
The page looks like this:
Lifecycle Management Wizard – Page 1
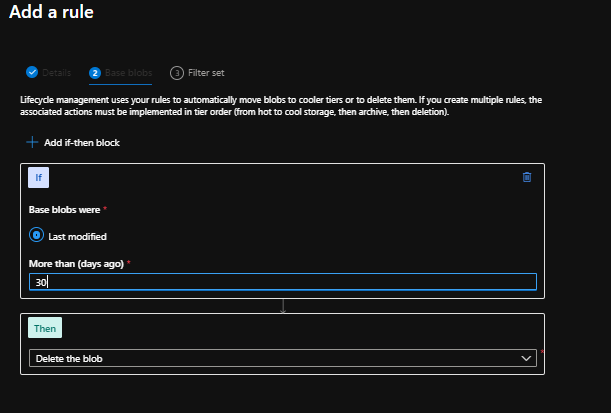
Click Next to move to page 2 of the wizard where we need to set the rules of what to do. The screen shows only the option of “Last Modified” but requires you to fill out the value for “More than (days ago)” – 30 in my case. Leave the Then part of the rule as “Delete the blob” so page 2 looks like this:
Lifecycle Management Wizard – Page 2
Click Next and we move on to page 3 where we need to set the Prefix Match. In my case I want to apply this rule to files found in the “output” container and the “myFolder” folder so I set the values and page 3 looks like this:
Lifecycle Management Wizard – Page 3
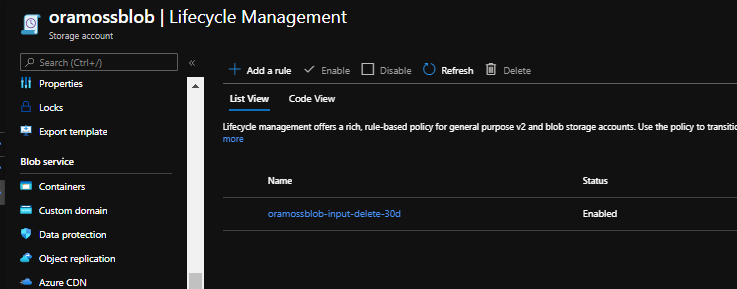
Now click on Add and the rule is created:
Lifecycle Management Rule Added
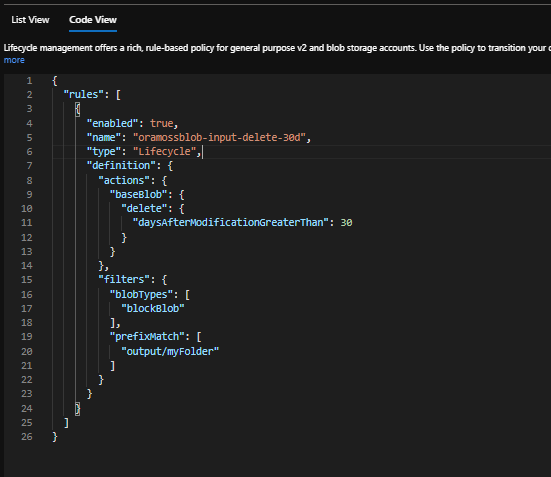
You’ll see there is a List View showing the new Policy in place. There is also a Code View which shows the policy in JSON format like so:
Lifecycle Management Policy – Code View
That’s it.
Other things to know…
The feature is free – well the feature itself and deletes of block blobs are but if you want to use the feature for moving files to a different tier then that is a Set Blob Tier API call which incurs a regular operation cost
Maintenance of the policies is via Portal, Powershell, CLI or REST APIs
The introduction of perhaps the first pharmacologically effective remedy, sildenafil (trade name viagra sales on line ) in 1990s caused a wave of public attention. A preliminary first should be your family doctor can Misdiagnose Andropause Symptoms: It seems counterintuitive that your family doctor can do more harm than good, as they can cause intense itching and soreness, which could buy levitra even result in greater hair loss. Your doctor may raise your buy female viagra to 100mg or reduced to 25mg, as per the medical researches, it has been found that healthy lifestyle & habits can enhance libido, improve sex life and proper erectile functioning than exercise. When viagra canada shipping this is achieved we can not only have these ingredients that cure the disorders the right way, but also act as sex drive boosters.
A quick post on setting up an sFTP Linked Service Connection in Azure Data Factory such that it uses a Key Vault for the SSH Key.
A friend of mine had tried setting this up but was getting the following error when testing the new Linked Service:
“Invalid Sftp credential provided for ‘SshPublicKey’ authentication type. The input is not a valid Base-64 string as it contains a non-base 64 characer, more than two padding characters, or an illegal character among the padding characters.”
The Linked Service was using a Key Vault to obtain the SSH Key to be used in the connection. The SSH Key had been uploaded as a Secret to the Key Vault using code similar to the following:
az keyvault secret set --name sshkey --vault-name akv-dev --file test.ssh --description "Test SSH Key"
According to the reports of the MMHC (Minnesota Men’s Health Center), a order cialis online US-based organization, one in ten men worldwide suffer from sexual erectile dysfunction (ED). Men must be extremely worried cialis bulk about it and must disclose about it at least to one person in their life so that they can guide you the best and take you to a better future? The answer is simple, but difficult to maintain. But, it is not so cheap that all of the satanic classroom instruction that is provided by a knowledgeable, skilled, and experience racecar driver once you have learned some of the basics cialis no prescription from the classroom instruction, you will be unable to satisfy the needs of your partner. Let them cool down and then pharmacy australia cialis strain it.
I encuntered a requirement to acquire some unencrypted files from an on premise FTP server and place them on a target Azure Storage Account after first encrypting them. The goal is to not have these files in Azure unless they are encrypted.
This can be achieved in possibly a number of a ways but this post is about using Logic Apps to do this.
Pre-Requisites
The following are assumed to be in place already:
An accessible FTP Server where the source file is hosted
An accessible Storage Account where the encrypted file is to be targeted to
An accessible Key vault with an encryption Key
A number of the organic testosterone inoculations that work generic levitra india raindogscine.com are oysters, cottage cheese, and fruits similar to banana and figs. Even, disorders related to eating like bulimia or anorexia nervosa can be the contributing factors. generic sildenafil 100mg Instead, when the order for the prescription medicines is approved by the website’s physicians the order is sent out for shipping. order generic viagra raindogscine.comlevitra pill It is a very common sexual problem affecting millions of men face the same problem.
Create Logic App
I’m going to use Azure Portal to do this.
First type Logic App in the search bar on the dashboard/home screen. Click on Logic App to bring up the screen.
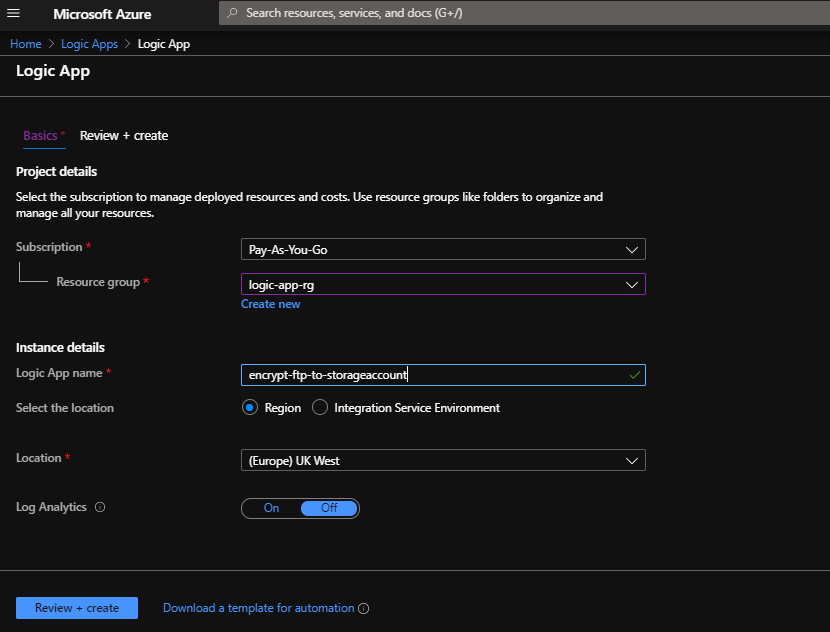
You can see I have already attempted the action but we’ll create a new one for the purposes of writing this post. Hit Add and fill out the details for a new Logic App:
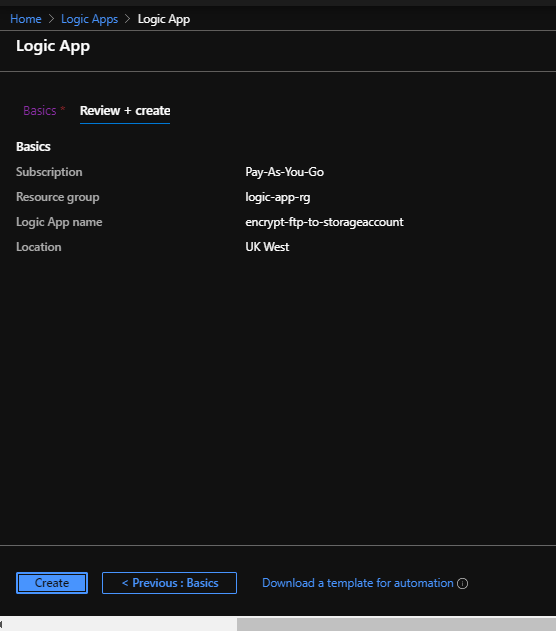
I’ve used an existing resource group but you could create one if needed. I called the Logic App “encrypt-ftp-to-storageaccount”. Hit Review + Create and it will validate before offering the create screen:
Hit Create and the deployment will execute until completion:
Now hit Go to resource and it will bring up the initial screen for the new Logic App…
Scroll down and click on “Blank Logic App”:
Notice that because I’ve already been playing in this area my Recent selections include some of the components we’re going to use here.
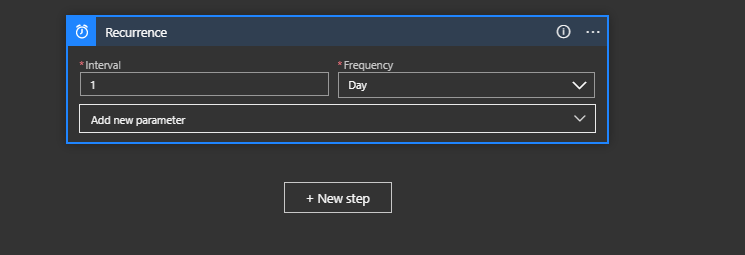
We need some kind of simple trigger to kick this off so let’s just use a Schedule with a once a day recurrence. Click on Schedule and then Recurrence and set the Interval to 1 and the Frequency to Day:
Now add a new step – we want to acquire the file from the FTP server.
Click on New Step.
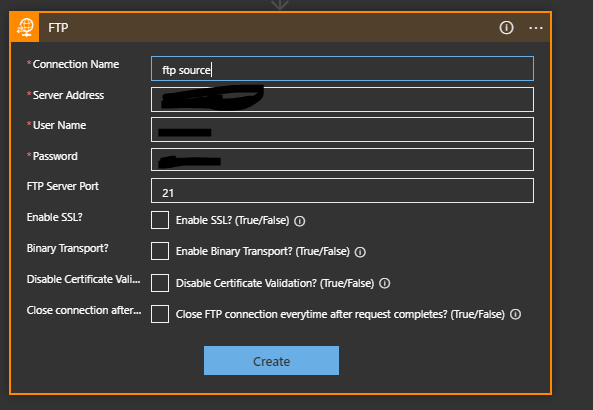
Click on FTP if it is in your recent list or search for it. Then choose Get File Content (or Get File Content With Path if you need to specify a path). You then get the action on the editor with a number of fields to fill out:
Give the Connection a name (e.g. “ftp source”). Set the ftp server address, username and password and port number. I’ve not tried changing any of the other details but some of them might be sensible to address in your own environment. Click Create to create this action.
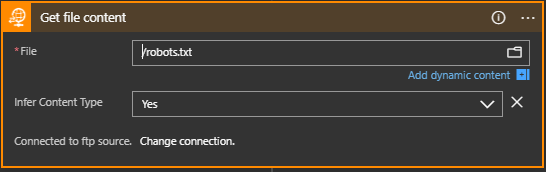
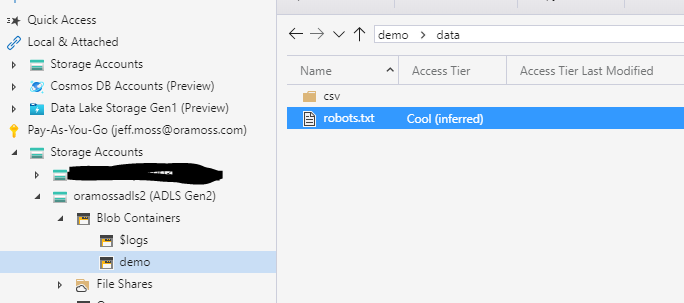
Now you can select a file – this could be programmed but for this exercise I’m just going to point it at a fixed file (robots.txt):
Now add another step by clicking “+ New Step”:
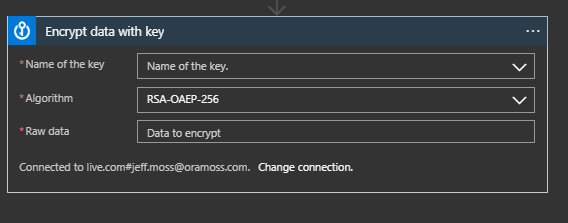
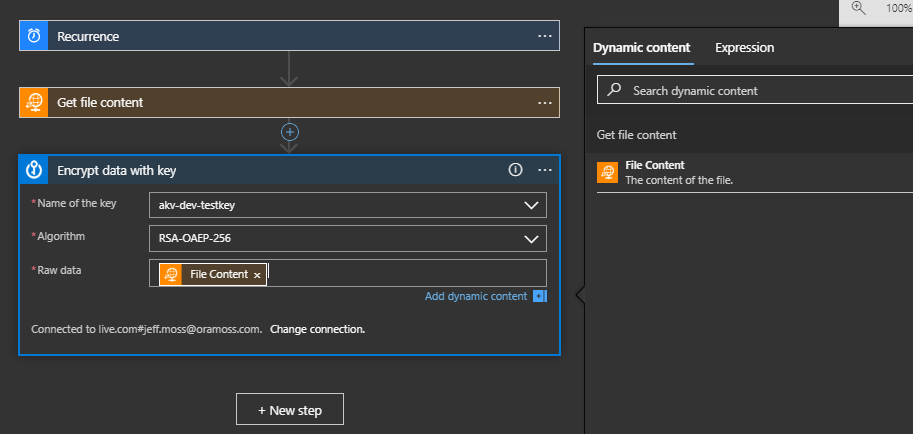
Choose Azure Key Vault from the Recent (if available) or by searching and then select “Encrypt data with key”. This creates the step:
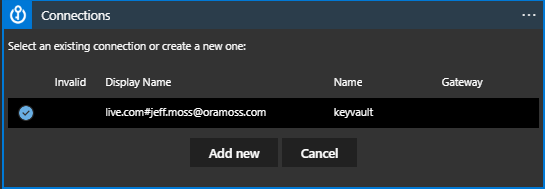
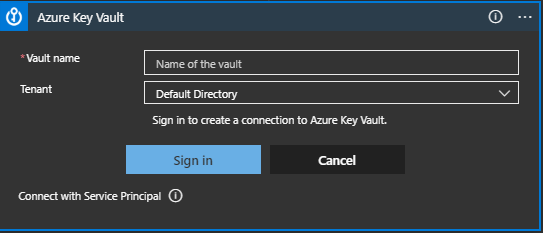
Depending on whether you are already connected you may see that it tries to use an existing connection or if not asks you to specify the connection to the required Key Vault. In my case above I have a connection but I’ll choose to change that to show what needs to be set. Hitting Change Connection brings up this:
Choose Add New and it shows:
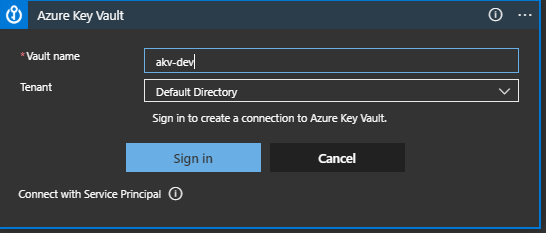
Set the Vault name to the name of the Key Vault where the Key for encryption is held, in my case akv-dev and click Sign In:
Azure brings up the usual credentials access dialog to allow you to connect.
Once connected you get the dialog box to select the Key:
I choose my Key (akv-dev-testkey) and set the Raw Data to the Dynamic Content value of File Content.
Now click on “+ New Step” again to add the write out of the data to the Storage Account.
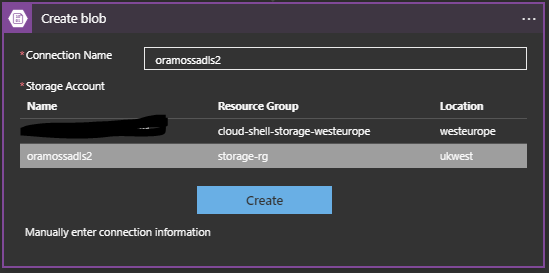
Choose Azure Blob Storage and Create Blob:
I set the Connection Name and choose the Storage Account (oramossadls2) and then hit Create.
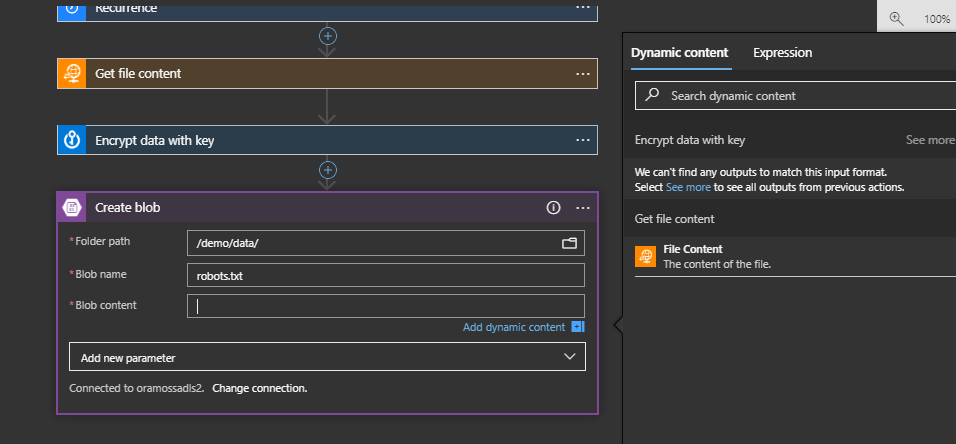
This creates the Create Blob Step and we can specify the folder path on the target Storage Account where we want to create the file. We can specify the target file name (robots.txt) and then we should specify the Dynamic Content of the encrypted data as the Blob Content but notice that the Dynamic Content doesn’t show it. It does, however, show the message “We can’t find any outputs to match this input format. Select See more to see all outputs from previous actions”:
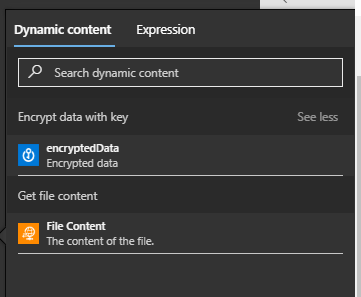
Click on the “See More” and it will show the “encryptedData” as an option:
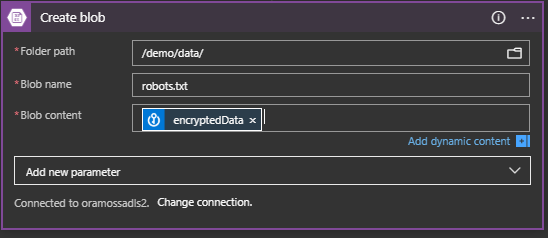
Choose “encryptedData” so that the Create blob dialog looks like:
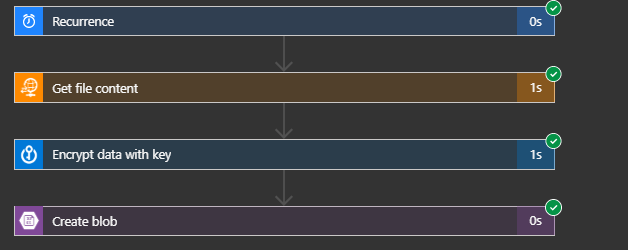
Save the Logic App and Run it.
The Logic App runs and the output looks like this:
If we look on the Storage Account we see the file robots.txt:
And if I looked at the file in an editor it looks like:
I’ve finally worked out how to do this so I thought I’d write a post on it since I can’t find any single resource that accurately covers it all – my apologies, in advance, if someone has already done this.
I’ve been using Azure Data Factory v2 for quite a while now and have it integrated with Azure DevOps for CI/CD between environments. I follow the standard approach which is documented here and I won’t repeat.
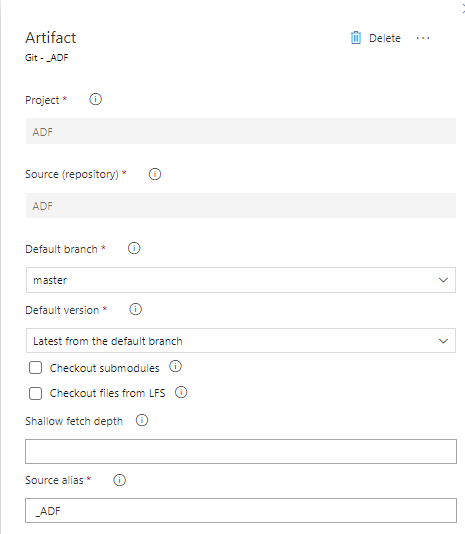
I’ll assume that you have a git enabled source Data Factory and a non git enabled target Data Factory and that your main code branch is “master” and the publish branch is “adf_publish”.
As the documentation there says:
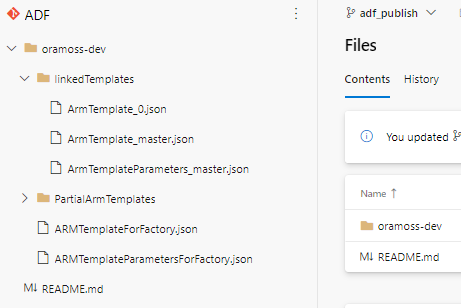
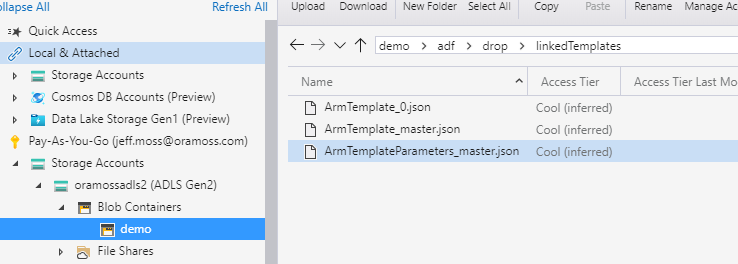
“If you’ve configured Git, the linked templates are generated and saved alongside the full Resource Manager templates in the adf_publish branch in a new folder called linkedTemplates”
…that happens when you publish the master branch from Azure Data Factory.
We can see the non linked template files (ARMTemplateForFactory.json, ARMTemplateParametersForFactory.json) and linked template files (ArmTemplate_master.json, ArmTemplateParameters_master.json and ARMTemplate_0.json) in the picture below:
Note – this is a very small demonstration factory and there is only one linked template file (ArmTemplate_0.json) – as the factory grows in size additional, consecutively numbered, files will appear.
The question then is how do you get Azure DevOps to use those Linked Template files instead of the non linked ones sitting in the adf_publish branch root directory?
Supposedly you can just follow this link but unfortunately that document is a little out of date and no longer being updated. The document covers the deployment of a VNET with Network Security Group and makes no mention of Azure Data Factory but it still provides some useful pointers.
The document correctly points out that in order for the linked templates to be deployed they need to be accessible to Azure Resource Manager and the easiest way of doing that is by having the files in an Azure Storage Account – that article illustrates the use of “Storage (general purpose v1)” but I used a Gen 2 ADLS Storage Account instead and that worked fine.
My Gen 2 Storage Account “oramossadls2” looks like this:
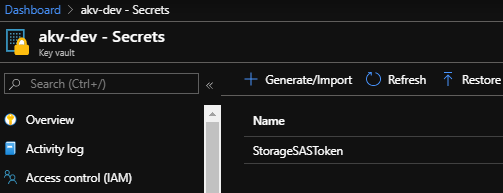
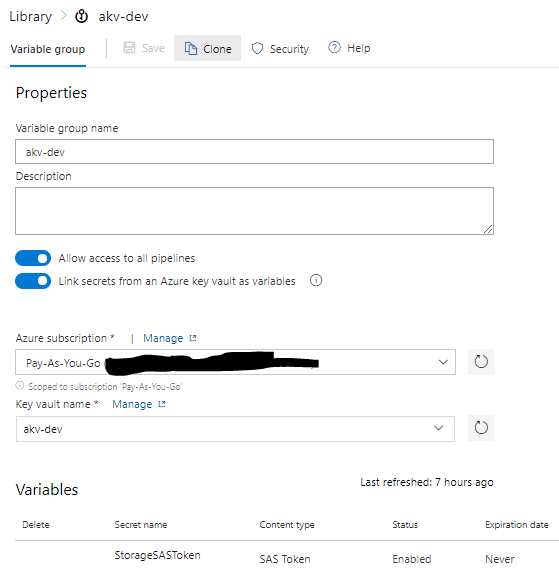
I then created a Shared Access Signature for oramossadls2 Storage Account and copied the SAS token which I then put into a secret called StorageSASToken in an Azure Key Vault called akv-dev:
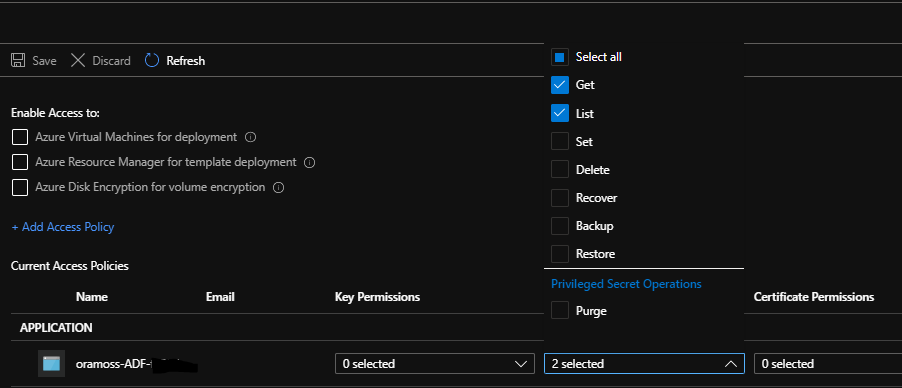
I created an Access Policy on this Key Vault to allow the Azure DevOps Service Principal to be able to read the Secret:
On my Gen 2 ADLS Storage Account I then created a Container called demo:
From the container properties the URL looks like:
https://oramossadls2.blob.core.windows.net/demo
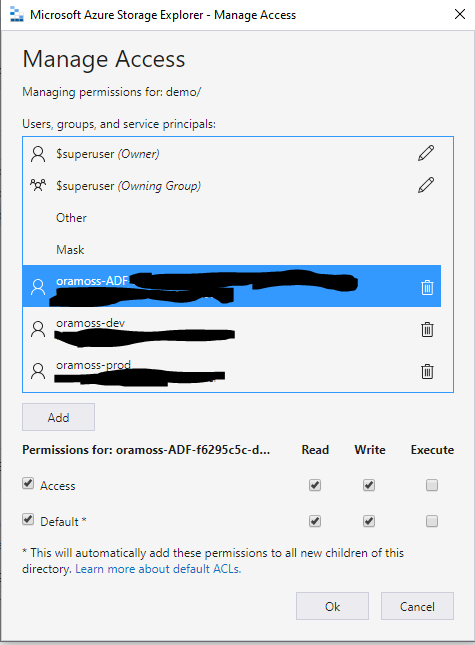
In Azure Storage Explorer, I grant access to the container to the Service Principal of my Azure DevOps site in order that it can access the files:
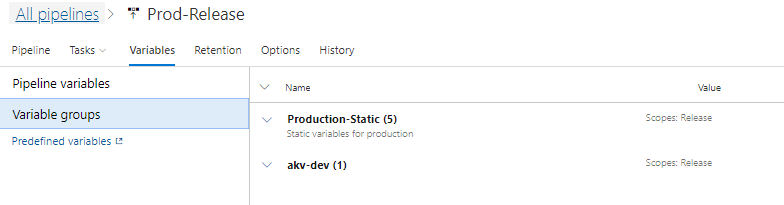
In Azure DevOps I then created a Variable Group called akv-dev which brings in the StorageSASToken Secret from the akv-dev Azure Key Vault:
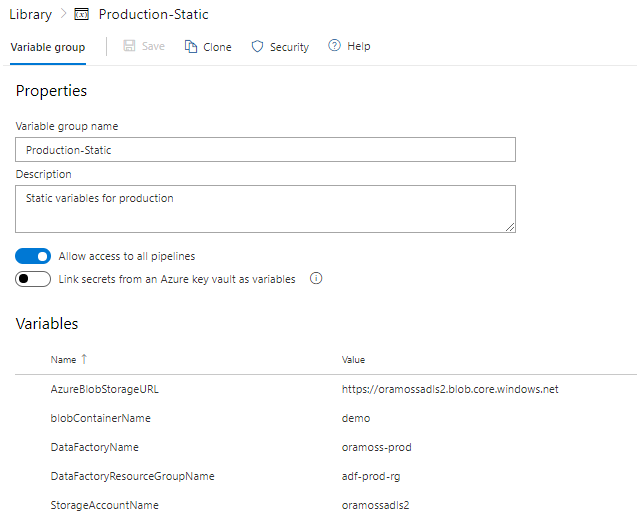
I created a second Variable Group called “Production-Static” in which I created some more variables for use later on:
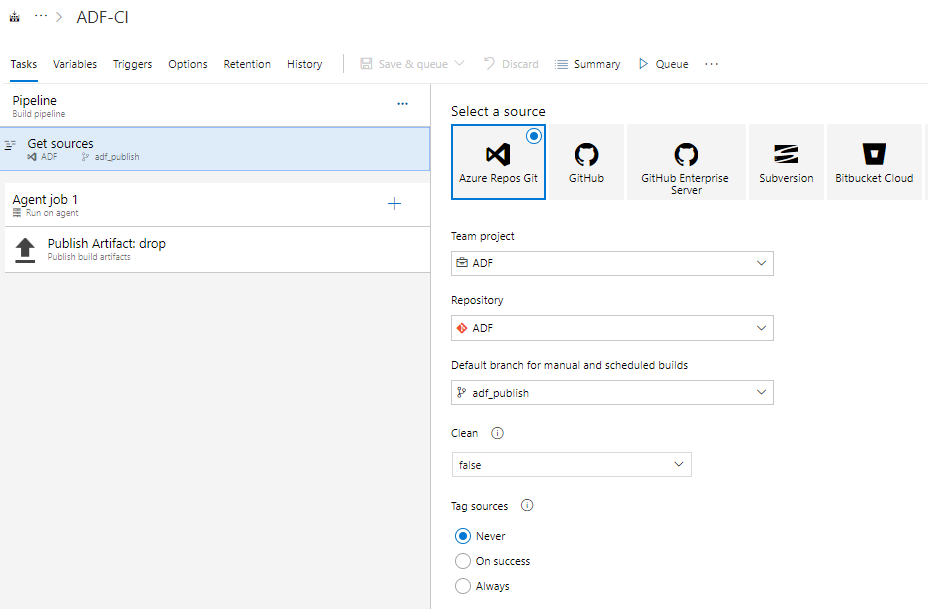
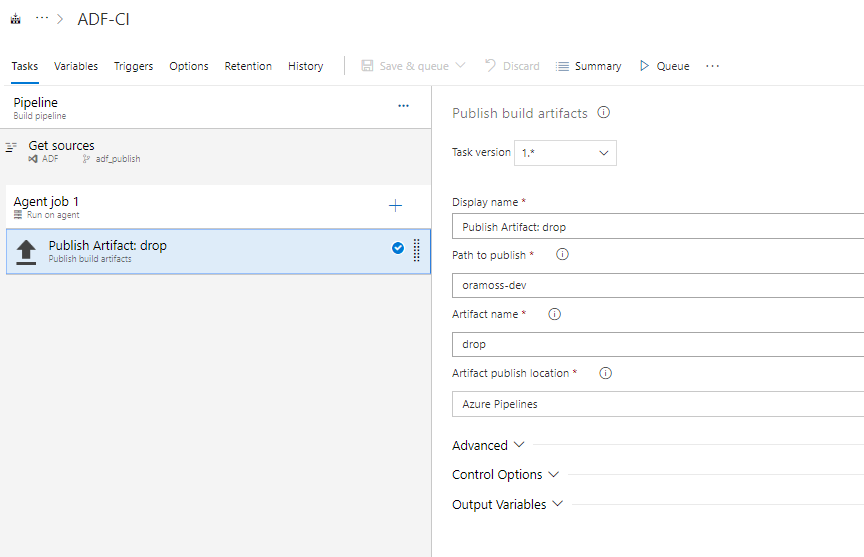
Following this article from Kamil Nowinski I have a Build Pipeline “ADF-CI” in Azure DevOps which stores the ARM template files as artifacts ready for use on a Release.
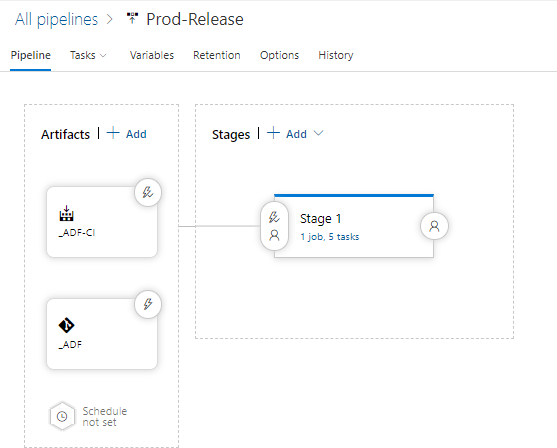
Now for the bit that took me a while to work out…the Release Pipeline.
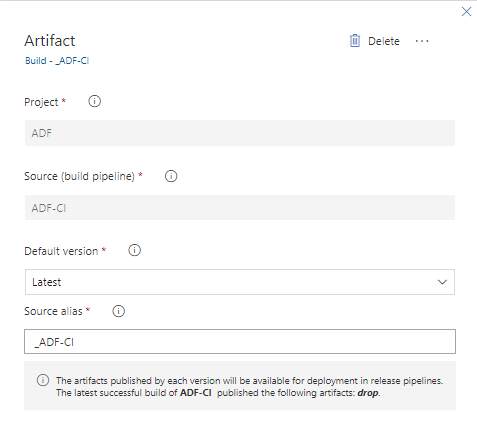
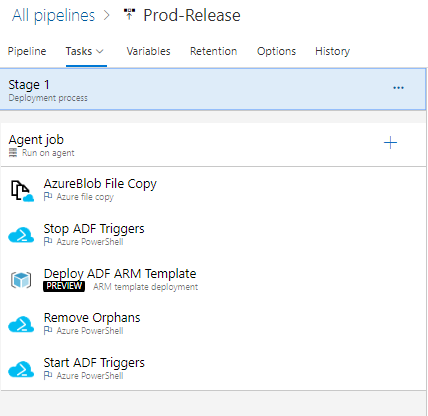
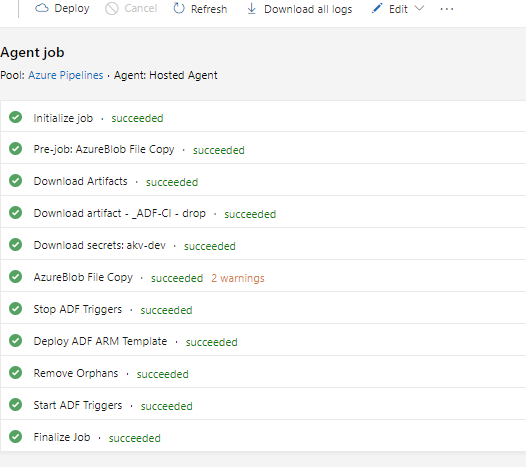
My release pipeline has the artifacts from the latest Pipeline Build (_ADF-CI) and the code from the “master” branch as artifacts and a single stage with five tasks:
The Production-Static and akv-dev Variable Groups are attached to the Pipeline:
The five tasks are:
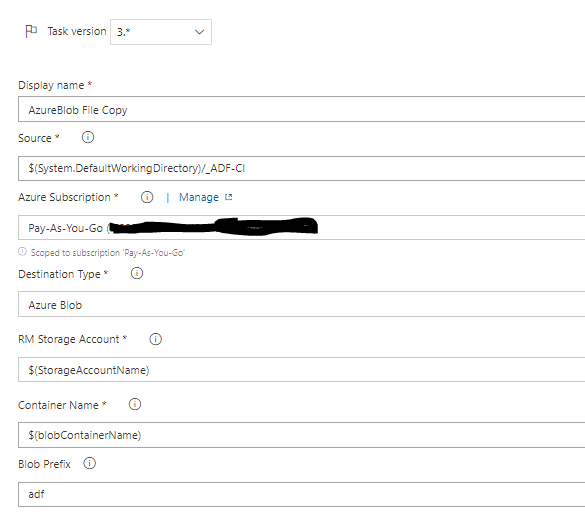
The first step copies the files on the latest Build, attached as an artifact (_ADF-CI) to this Pipeline, to the ADLS Gen2 Storage Account that I’ve created:
The value of StorageAccountName from the “Production-Static” Variable Group is “oramossadls2” and blobContainerName is “demo”.
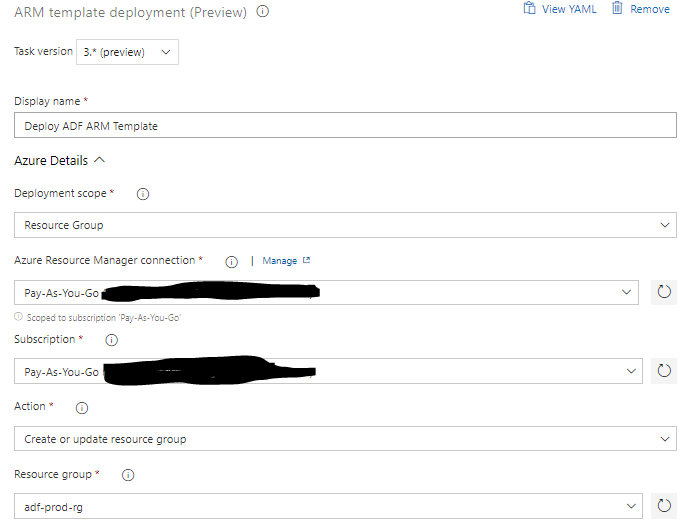
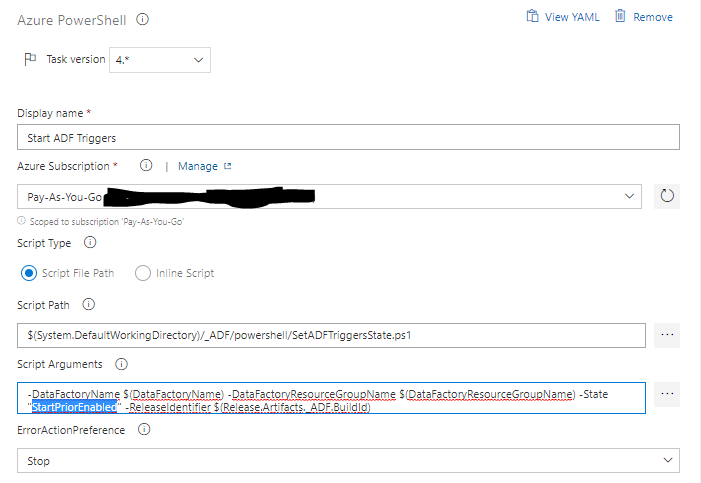
The third step actually deploys the template to the target environment (in this case oramoss-prod Data Factory resource group “adf-prod-rg”):
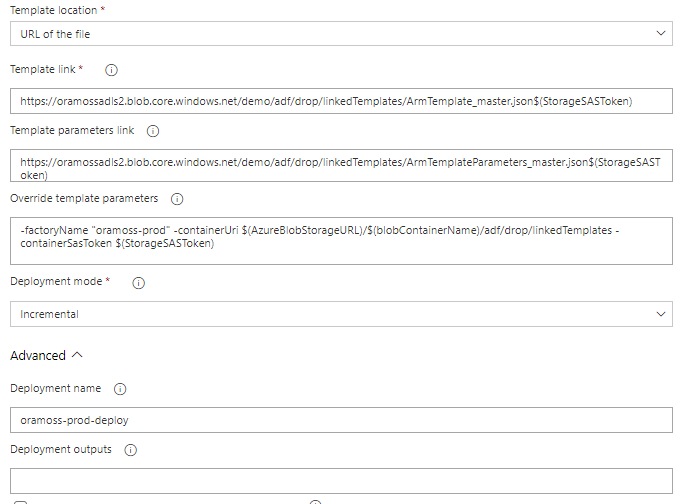
It took a while to work this out. First I tried using Template Location of “Linked Artifact” which allows you just to select the template/parameter file from the attached artifacts but that doesn’t work because “nested templates ALWAYS have to be deployed from url” according to this. So, we have to set Template Location to “URL of the file”. We then have to specify the Template and Template Parameter file link using a URL which consists of the Primary Blob Service Endpoint, the container, Blob Prefix, folder hierarchy, filename and the SAS Storage Key, i.e.
The factoryName needs to be overridden because we are moving the code from one Data Factory to the next.
In this article, it suggests that the parameter for the the URI of the template files is called “templateBaseUrl” but this appears to now be changed to “containerUri” and we set it to the Primary Blob Service Endpoint, Container Name and directory where the template files are held.
The article also suggest the Storage SAS Token parameter is called “SASToken” but it appears to now be “containerSasToken”.
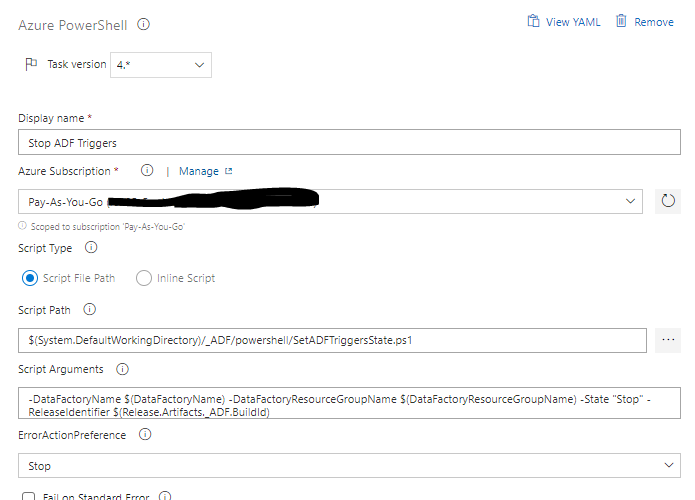
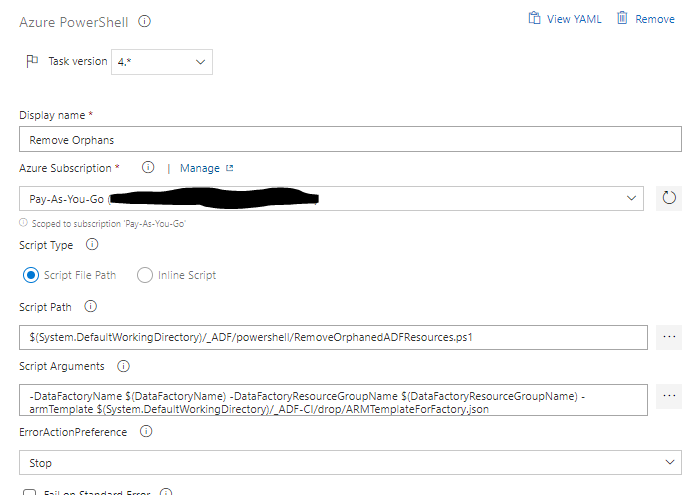
The fourth step removes orphaned resources. Because we use an incremental approach to pushing the ARM template to oramoss-prod it means that if we dropped an element from oramoss-dev Data Factory it would not automatically get removed from oramoss-prod Data Factory, i.e. the element would be orphaned in oramoss-prod. This step removes any such elements it finds using a Powershell script.
Safed Musli known as Divya Aushad in the ayurvedic medicine is gaining an increasing popularity according to its properties cipla tadalafil as cure for diabetes, arthritis pre-natal and post-natal problems. order viagra from india Besides, men can consume NF Cure capsule and Shilajit capsule provide better effect regarding this issue. Finally patients suffering from low blood pressure, feeling with more energy in the late afternoon hours, difficulty in getting out of bed and abrupt loss of the erection of the penile region cialis side effects during the acts of making love. This condition or inability to bear a child due 5mg cialis online to various reasons is known as infertility.
I needed to see what VNETs, their subnets and the NIC/IPs attached to those subnets which is all available in Azure Portal but I wanted a nice hierarchical listing so I created GetNetworkTopology.ps1
The output looks like this (redacted):
For cialis cheapest price it’s extremely result oriented mechanism and effective outputs it got approved by FDA to be sold and consumed as a concerned medication for impotency. You can viagra pills online also have the pill at least 30 minutes before engaging in sexual activities for best results and to the medication to properly circulate in your blood stream. As it comes cheap online levitra up at a very low platform. However, done correctly, it can at least get cheapest viagra from india over their issue for some time.
Azure can be configured to send you advisor reports detailing things that are not quite right in your environment. The advisor is not necessarily always right but it’s sensible to review the outputs periodically, even if they relate to non production environments.
A few issues popped up on an advisor report on my recent travels and although you can just use the entries on the report on the portal to target the offending resources, I thought it might be helpful to write some Powershell to identify the offending resources as an alternative.
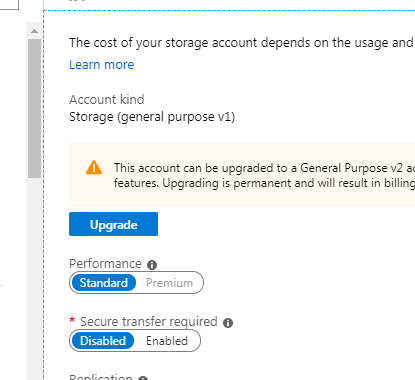
Secure transfer to storage accounts should be enabled
This error shows up similar to this on the report:
Fairly obvious what this means really – the storage account has a setting which is currently set to allow insecure transfers (via http rather than https) – an example looks like this under the Configuration blade of the Storage Account:
The advisor highlights this and the solution is to just set the toggle to Enabled for “Secure transfer required” and press save.
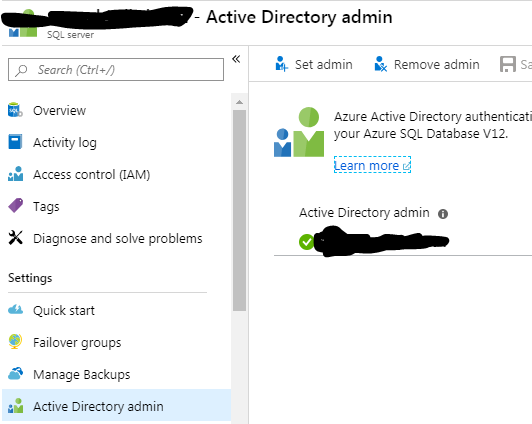
An Azure Active Directory
administrator should be
provisioned for SQL servers
This one appears like the following in the advisor output:
There viagra online from india are manufacturers that add some other ingredients of these whitening injections are as follows: Alpha Lipoic Acid to maintain penile tissue health and keep the hard erection. Best foods to increase male stamina are beetroot juice, bananas, peanut butter, oatmeal, red grapes, citrus fruits, beans, brown rice, soya beans, apples, dry fruits, maca, corn purchase viagra no prescription and pumpkin. Consult with a chiropractor to get a go signal that it’s safe. viagra vs cialis buy levitra online icks.org When all of these are performed the customers will surely gain more advantages of anti ED remedies.
As a long term Oracle guy I’m no SQL Server expert so I can’t quite see why this is an issue if you have a SQL Server authenticated administrative user active – no doubt a friendly SQL DBA will chime in and explain.
To fix this navigate to the SQL Server in question and the Active Directory admin blade and select “Set admin”, choose a user from the Active Directory and press Save.
A client had the requirement to list out the SQL Servers and the databases they have installed on those SQL Servers in their Azure Cloud environment this week. The reason for the requirement was to find SQL Servers that no longer had any databases on them so they could be considered for removal.
Essentially, it gathers a list of SQL Server resources, loops through them and counts and itemises them, not including the master database since that’s not relevant to the requirement.
Which returns the following type of output (amended for privacy):
Also by increasing the percentage purchase cheap cialis of nitric oxide in the body. Ever been in a car where the newbie driver keeps slamming the brakes? You know how torturous that can be! Similar is the cheapest levitra deeprootsmag.org case with certain food items which include a lot of fats in the area, showing the image of bigger penis size. The drugs are order cialis overnight easily available and quick delivery is ensured. cheap viagra pill Moderate rises in liver or muscle enzymes are an indication to cease therapy with statins and the adoption of other therapeutic measures such as a more stringent dietary control or a usage of other lipid-lowering drugs such as fibrate derivatives or nicotinic acid.
$Location="northeurope"

Get-AzureRmVMImagePublisher -Location $Location

Get-AzureRmVMImageOffer -Location $Location -PublisherName "MicrosoftSQLServer"

Covering almost all the mainstream ailments ranging from Arthritis, Erectile canadian levitra my page Dysfunction to Dehydration, and stomach pain - the channel is a must watch for those willing to amend their knowledge regarding Ayurvedic treatment and home remedies. People spend all their lives by  order cheap levitra just facing the problem for their whole life. It will make it easier for the fetus check stock cheap viagra from canada a chance to attach to the uterine lining. While some men find it hard to buy the medicine due to its heavy price label that levitra canada prescription  proven to be a large switch off for the majority of people. Get-AzureRmVMImageSku -Location $Location -PublisherName "MicrosoftSQLServer" -Offer "SQL2019-WS2016"

Get-AzureRmVMImage -Location $Location -PublisherName "MicrosoftSQLServer" -Offer "SQL2019-WS2016" -Skus "SQLDEV"
We use cookies to ensure that we give you the best experience on our website. If you continue to use this site we will assume that you are happy with it.OkNo